
3 Simple Steps to Get Organized for Back-to-School Success!

03 Sep 2024
3 Simple Steps to Get Organized for Back-to-School Success!
As the Boston area back-to-school season approaches, it’s time to transition from the laid-back days of summer to a more structured routine. This period can feel overwhelming, with new schedules, school supplies, and the return of homework. However, with a little planning and organization, you can set your family up for a successful start to the school year. Here at Organizing Boston, we recommend these 3 simple steps to get organized for back-to-school success and ensure a smoother, less stressful return to the school grind.
Step 1: Design Your Family Command Center
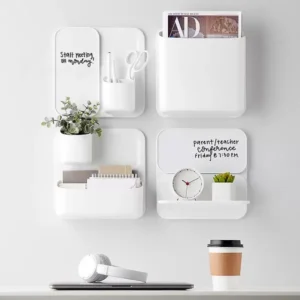 As a busy parent, you know that keeping track of family schedules and school assignments can be challenging. A well-organized family command center is the heart of your home organization. It is the designated space where you manage family activities, school schedules, meal plans, and important paperwork. Here are some tips to create an organized command center for back-to-school:
Choose the Right Location: Pick a central spot in your home, like the kitchen, entryway, or a hallway, where everyone passes by frequently. This ensures that the command center is easily accessible.
Incorporate a Calendar: A large calendar is a must-have. Whether you opt for a whiteboard, chalkboard, or paper calendar, make sure it has enough space to jot down everyone’s activities, appointments, and important dates.
Add a Bulletin Board: Use a corkboard, magnetic board, or pinboard to post school flyers, reminders, or invitations. This is also a great spot for displaying kids’ artwork that they’re particularly proud of.
Create a Mail and Paper Station: Install a wall-mounted file organizer or use baskets to sort incoming and outgoing mail, school forms, and bills. Label each section clearly to prevent papers from piling up.
Set Up a To-Do List or Chore Chart: A dry-erase board or a chalkboard is perfect for listing daily or weekly chores, grocery lists, and reminders. This helps everyone stay on top of tasks.
Personalize with Hooks and Cubbies: Install hooks for keys, bags, and coats. Consider adding cubbies or baskets for each family member to store their personal items like school supplies, sports gear, or backpacks.
Product Pick: Our team at Organizing Boston has extensive organizing product knowledge, so we asked one of our lead organizers, Brianna Natale what her go to product is when she is creating a family command center. Bri says she loves to use a Dry Erase Board Calendar and Modular Magnetic Boards.
Step 2: Organizing Storage for Kids’ Schoolwork
 Managing schoolwork and assignments can be a breeze with the right storage solutions.combined with effective storage solutions can make life easier, more organized, and clutter-free. Here’s how to set up and create storage systems that celebrate your children’s creativity while keeping everything in order.
Create a Homework Station: Dedicate a space where your kids can focus on their homework. A small desk or table with good lighting, a comfortable chair, and organized supplies (pens, pencils, notebooks) is essential.
Use Binders or Folders for Each Subject: For older kids, keep their assignments and notes organized with color-coded binders or folders for each subject. Label them clearly and store them on a bookshelf or in a cubby.
Establish a Weekly Review System: At the end of each week, go through the papers your kids bring home. Decide what needs to be kept, what can be recycled, and what should be stored for future reference. This keeps clutter at bay.
Set Up a Filing System for Long-Term Storage: Invest in a filing cabinet or a portable file box for long-term storage of important schoolwork, report cards, and projects. Use labeled folders or tabs for each school year and child.
Product Pick: For organizing storage product recommendations, we asked another one of our lead organizers, Katelynd Schmidt. Here are Kate’s suggestions: For families with two or more school aged children, Kate likes the Elfa Rolling File Cart. “My clients know that I love labeling and color coding,” says Kate, “and the rolling file allows you to have a different hanging file color for each child. Plus, it works in homes that don’t have dedicated offices as it easily tucks away into a spare room or closet when you have company.” Kate also suggests that you transfer the important papers into a Water-Proof Clear Container and label it the child’s name or picture once the school year is over.
Step 3: Storing Kids’ Artwork
 Children’s artwork is precious, but it can quickly take over your home. Here’s how to preserve their masterpieces without overwhelming your space.
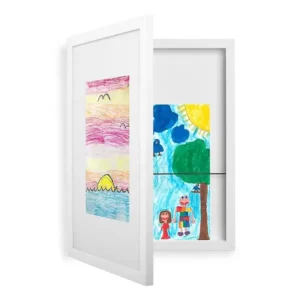
Create an Art Gallery Wall: Dedicate a wall in your home to showcase your children’s artwork. Use frames, clipboards, or a wire with clips to rotate their latest creations. This makes them feel proud of their work while keeping it organized.
Use Art Portfolios: Store larger or special pieces in an art portfolio or large plastic storage container. Label each with the child’s name and year. This method keeps the artwork safe and allows for easy access.
Digitize Artwork: For a clutter-free option, consider scanning or photographing your kids’ artwork. You can then create a digital gallery or photo book, which saves space and still preserves the memories.
Create a Keepsake Box: Designate a keepsake box for each child where you can store their most cherished artwork, certificates, and special school projects. Choose a box that’s sturdy and large enough to hold various items.
Rotate Art Displays: Change out the artwork on display every few months. Store older pieces in a portfolio or keep a few for framing. This keeps your home fresh and gives each child’s work it’s time to shine.
Product Pick: Andrea Falvey has been working at Organizing Boston for over three years. She has a few favorite products for storing important items: “I love using Bigso Storage Boxes from The Container Store because not only are they functional, but they are a visually attractive way to store keepsakes and artwork. For those special pieces, I recommend using home decor frames, like the Umbra Artista Kids Frame. These frames allow you to easily switch out artwork without any of the hassle or fuss. However for long term storage I often recommend clear, weather-tight storage containers,” says Andrea.
Creating a family command center and organizing storage for your children’s schoolwork and artwork doesn’t have to be overwhelming. With a little planning and the right tools, you can transform chaotic areas into functional and aesthetically pleasing spaces. This approach not only keeps your home tidy but also helps instill organizational skills in your children, setting them up for back-to-school success!
Sarah Buckwalter
Comments
Comments are closed.
… [Trackback]
[…] Read More Infos here: organizingboston.com/3-simple-steps-to-get-organized-for-back-to-school-success/ […]